Along with the shift to Apple Silicon, performing things like a restore is different with M1 Macs compared to their Intel predecessors. Follow along for a look at how to revive and restore M1 Macs, what the difference is, when to use them, and what to try before taking those steps.
Performing a restore (factory reset) with Intel Macs uses macOS Recovery. While that’s still an option for doing things like reinstalling macOS on M1 Macs, there’s a different process to fully restore an M1 Mac or in limited cases, the need to revive an M1 Mac.
Table of contents
How to revive and restore M1 Macs – MacBook Air, Pro, and Mac mini
What is an M1 Mac revive?
Here’s how Apple describes when you would need to “revive” an M1 Mac and what it does:
In very rare circumstances, such as a power failure during a macOS upgrade, a Mac may become unresponsive and so the firmware must be revived. A revive updates the firmware and updates recoveryOS to the latest version. A revive is designed to not make any changes to the startup volume, the user’s data volume, or any other volumes.
However, keep in mind that if you need to reinstall macOS after performing a revive, that will erase your drive.
What is an M1 Mac restore?
A restore will erase your Mac’s drive but it also restores the firmware, updates recoveryOS to the most recent version, and reinstalls the latest version of macOS. As such, you’ll want to have your data backed up.
Already tried to reinstall macOS?
If you can boot up your M1 Mac to macOS Recovery, you may be able to reinstall macOS without having to revive or do a full restore which both require a second Mac and Apple Configurator 2. This will erase your drive.
- With your Mac powered off, press and hold the power button until you see “Loading startup options”
- Choose Options and click Continue
- If needed, enter your password
- Now choose Reinstall macOS and hit Continue and follow the prompts
What you need to revive or restore M1 Macs
If you can’t do that or know you want to fully restore your M1 Mac, here’s what you’ll need:
- A second Mac with the latest version of Apple Configurator 2 installed (and internet access)
- Apple notes “You may need to configure your web proxy or firewall ports to allow all network traffic from Apple devices to Apple’s network 17.0.0.0/8.” Read more on this here.
- A USB-C to USB-C cable (or USB-A to C cable) Apple notes it must support power and data and Thunderbolt 3 cables won’t work for this process
How to revive or restore
If your M1 Mac is unresponsive, you can try a revive first which won’t erase your data. If that doesn’t work or you know you want to erase your M1 Mac, you can perform a restore. Here are the main steps:
- Launch Apple Configurator 2 on a secondary Mac and connect it to your Mac that’s having issues
- Restart your M1 Mac that’s not responding with a special sequence
- Use Apple Configurator 2 on the secondary Mac to revive or restore
On a secondary (working) Mac
- Make sure you’re on the latest version of Apple Configurator 2
- Plugged into power and connected to the internet
- Plug in the USB-C cable
- Launch Apple Configurator 2
Preparing a non-working M1 MacBook Air or Pro
- Press the power button
- As you’re holding the power button down, simultaneously press all of these keys for roughly 10 seconds
- Right shift key
- Left Option key
- Left Control key
- After 10 seconds, release all of the keys except the power button until the Mac shows up in Apple Configurator 2 on your secondary Mac
Apple notes that “You won’t see any screen activity” on the Mac you’re trying to revive/restore.
Preparing a non-working M1 Mac mini
- Have it plugged into a monitor to see when the process is complete
- Unplug your Mac mini power cable for at least 10 seconds
- Press and hold the power button
- While still pressing the power button, plug the power cable back in
- Release the power button
- You should see the status indicator light turn red (amber) but you won’t see any screen activity for now
Reviving from the secondary (working) Mac
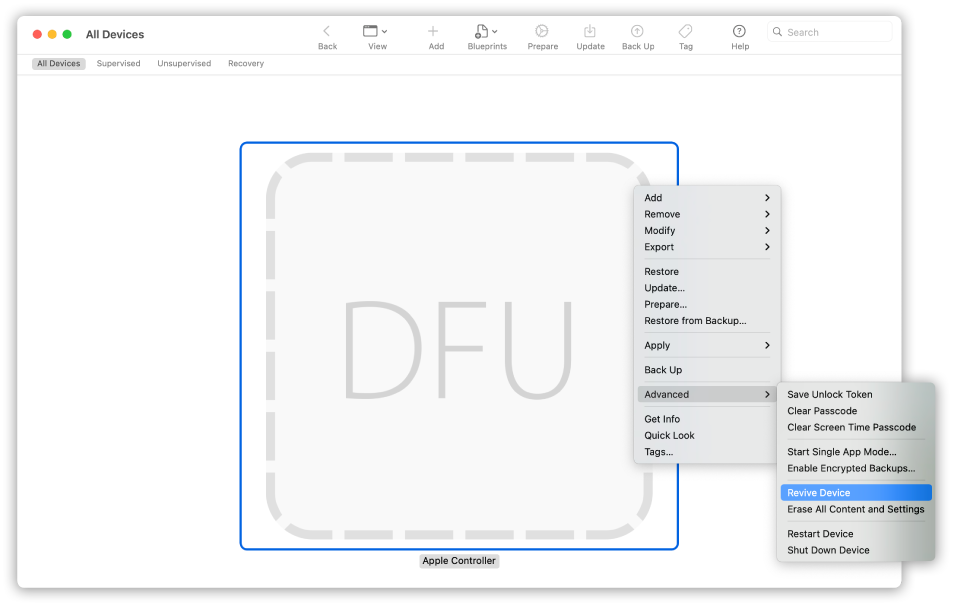
- In Apple Configurator 2, select the M1 Mac you need to revive/restore
- From the menu bar up top, pick Actions > Advanced
- Or Control-click the device > Advanced
- Choose Revive Device
- Apple notes that “When you revive the firmware, you must verify that the process was successful because Apple Configurator 2 may not alert you.”
- Now you can Quit Apple Configurator 2 and unplug the USB cable

Restoring from the secondary (working) Mac
- In Apple Configurator 2, pick the M1 Mac you want to restore
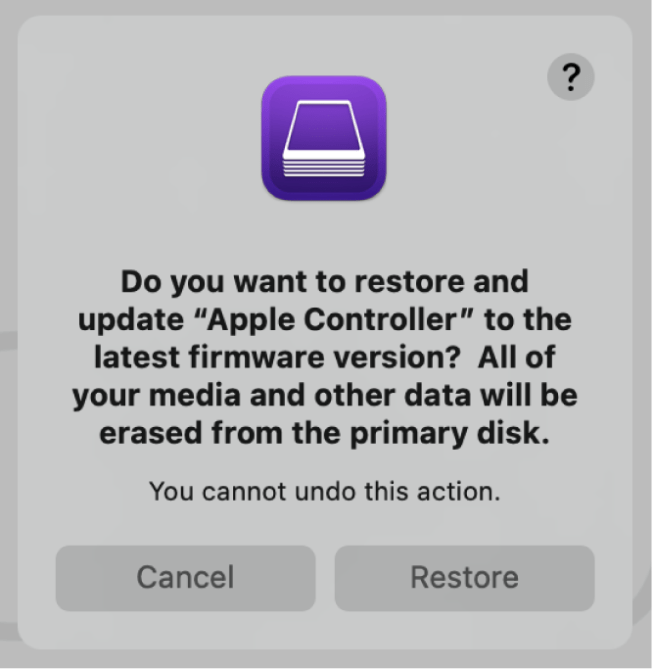
- From the menu bar up top, pick Actions > Restore
- Or Control-click the M1 Mac > Restore
- Choose Restore on the dialog box to confirm the process
- The process may take some time and during it the Apple logo will show up and disappear
- You Mac will restart when the process is finished
- Like with a revive, “When you restore the Mac, you must verify that the process was successful because Apple Configurator 2 may not alert you.”
- Apple highlights that when a restore is successful for an M1 Mac, the macOS Setup Assistant will appear
- You’re good to quit Apple Configurator 2 on your secondary Mac and unplug the USB cable

For more on reviving and restoring M1 Macs, you can find Apple’s support document here. And here is the support doc on using macOS Recovery with M1 Macs including reinstalling macOS.
FTC: We use income earning auto affiliate links. More.

Check out 9to5Mac on YouTube for more Apple news:
"how" - Google News
January 01, 2021 at 04:23AM
https://ift.tt/3n5wBCY
How to revive and restore M1 Macs, what the difference is, and when to use them - 9to5Mac
"how" - Google News
https://ift.tt/2MfXd3I
https://ift.tt/3d8uZUG
Bagikan Berita Ini


0 Response to "How to revive and restore M1 Macs, what the difference is, and when to use them - 9to5Mac"
Post a Comment